The project server data can be come here on the map using Bing services of the Windows live map.
Friday, July 24, 2009
Project server data on MAP
Wednesday, June 24, 2009
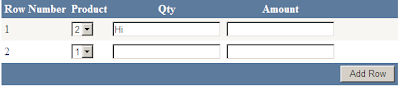
Add Rows dynamically to Gridview
First of all how is the Result will look a like :
</ItemTemplate>
</asp:TemplateField>
<asp:TemplateField HeaderText="Qty">
<asp:TemplateField HeaderText="Amount">
<PagerStyle BackColor="#284775" ForeColor="White" HorizontalAlign="Center" />
<SelectedRowStyle BackColor="#E2DED6" Font-Bold="True" ForeColor="#333333" />
<HeaderStyle BackColor="#5D7B9D" Font-Bold="True" ForeColor="White" />
<EditRowStyle BackColor="#999999" />
<AlternatingRowStyle BackColor="White" ForeColor="#284775" />
</asp:GridView>
DataRow dr = dr = dt.NewRow();
//Store the DataTable in ViewState
if (ViewState["CurrentTable"] != null)
DataRow drCurrentRow = null;
if (dtCurrentTable.Rows.Count > 0)
private void PreviousGridData()
int rowIndex = 0;
if (ViewState["CurrentTable"] != null)
DataTable dt = (DataTable)ViewState["CurrentTable"];
if (dt.Rows.Count > 0)
for (int i = 1; i < dt.Rows.Count; i++)
DropDownList drp = (DropDownList)grvForm.Rows[rowIndex].Cells[1].FindControl("drp");

Ok, let's start with the page Design:
Drop a Grid and in the design page & then put the control inside the Template Fields Column.
Like
<
asp:GridView ID="grvForm" AutoGenerateColumns="False" ShowFooter="True" runat="server" CellPadding="4" ForeColor="#333333" GridLines="None"><RowStyle BackColor="#F7F6F3" ForeColor="#333333" />
<Columns><asp:BoundField DataField="RowNumber" HeaderText="Row Number" />
<asp:TemplateField HeaderText="Product"><ItemTemplate><asp:DropDownList ID="drp" runat="server"><asp:ListItem Text="1" Value="1"></asp:ListItem><asp:ListItem Text="2" Value="2"></asp:ListItem></asp:DropDownList>
</ItemTemplate>
</asp:TemplateField>
<asp:TemplateField HeaderText="Qty">
<ItemTemplate>
<asp:TextBox ID="txtQty" runat="server"></asp:TextBox>
</ItemTemplate>
</asp:TemplateField>
<asp:TemplateField HeaderText="Amount">
<ItemTemplate>
<asp:TextBox ID="txtAmount" runat="server"></asp:TextBox>
</ItemTemplate>
</asp:TemplateField>
<asp:TemplateField FooterText="Add Row">
<FooterTemplate>
<asp:Button ID="btnAddRow" runat="server" Text="Add Row" onclick="btnAddRow_Click" />
</FooterTemplate>
</asp:TemplateField>
</Columns>
<FooterStyle BackColor="#5D7B9D" Font-Bold="True" ForeColor="White" />
<PagerStyle BackColor="#284775" ForeColor="White" HorizontalAlign="Center" />
<SelectedRowStyle BackColor="#E2DED6" Font-Bold="True" ForeColor="#333333" />
<HeaderStyle BackColor="#5D7B9D" Font-Bold="True" ForeColor="White" />
<EditRowStyle BackColor="#999999" />
<AlternatingRowStyle BackColor="White" ForeColor="#284775" />
</asp:GridView>
then on the page Load we have to bind the Grid and that Grid should show 1 Blank Row as shown below:
After that we will write code for the AddRow Button..
Now in the Page_Load Event Write following code.
DataTable
dt = new DataTable();DataRow dr = dr = dt.NewRow();
dt.Columns.Add(
new DataColumn("RowNumber", typeof(string)));dt.Columns.Add(
new DataColumn("Column1", typeof(string)));dt.Columns.Add(
new DataColumn("Column2", typeof(string)));dt.Columns.Add(
new DataColumn("Column3", typeof(string)));dr = dt.NewRow();
dr[
"RowNumber"] = 1;dr[
"Column1"] = string.Empty;dr[
"Column2"] = string.Empty;dr[
"Column3"] = string.Empty;dt.Rows.Add(dr);
//Store the DataTable in ViewState
ViewState[
"CurrentTable"] = dt;grvForm.DataSource = dt;
grvForm.DataBind();
after that we need to write code for the AddRow Function, and also we have to store the previous data(which has been put by the user) in the ViewState or session.
Now, code for that is as shown below:
private
void AddNewRowToGrid(){
int rowIndex = 0;
if (ViewState["CurrentTable"] != null)
{
DataTable dtCurrentTable = (DataTable)ViewState["CurrentTable"];
DataRow drCurrentRow = null;
if (dtCurrentTable.Rows.Count > 0)
{
for (int i = 1; i <= dtCurrentTable.Rows.Count; i++)
{
////extract the TextBox values
DropDownList drp = (DropDownList)grvForm.Rows[rowIndex].Cells[1].FindControl("drp");
TextBox txtQty = (TextBox)grvForm.Rows[rowIndex].Cells[2].FindControl("txtQty");
TextBox txtAmount = (TextBox)grvForm.Rows[rowIndex].Cells[3].FindControl("txtAmount");drCurrentRow = dtCurrentTable.NewRow();
drCurrentRow[
"RowNumber"] = i + 1;drCurrentRow[
"Column1"] = drp.SelectedItem.Text;drCurrentRow[
"Column2"] = txtQty.Text;drCurrentRow[
"Column3"] = txtAmount.Text;rowIndex++;
}
dtCurrentTable.Rows.Add(drCurrentRow);
ViewState["CurrentTable"] = dtCurrentTable;
grvForm.DataSource = dtCurrentTable;
grvForm.DataBind();
}
}
else
{
"ViewState is null");Response.Write(
}
PreviousGridData();
}
Now we will write the code for the PreviousGridData(); the code for this function is as shown below:
private void PreviousGridData()
{
int rowIndex = 0;
if (ViewState["CurrentTable"] != null)
{
DataTable dt = (DataTable)ViewState["CurrentTable"];
if (dt.Rows.Count > 0)
{
for (int i = 1; i < dt.Rows.Count; i++)
{
DropDownList drp = (DropDownList)grvForm.Rows[rowIndex].Cells[1].FindControl("drp");
TextBox txtQty = (T extBox)grvForm.Rows[rowIndex].Cells[2].FindControl("txtQty");
TextBox txtAmount = (TextBox)grvForm.Rows[rowIndex].Cells[3].FindControl("txtAmount");
drp.Text = dt.Rows[i][
"Column1"].ToString();txtQty.Text = dt.Rows[i][
"Column2"].ToString();txtAmount.Text = dt.Rows[i][
"Column3"].ToString();rowIndex++;
}
}
}
}
and you are done...!! Build the solution and hit Play....
Hope this helps some one.
P.s if you feel that this post has helped you, please do write your comments.
Thanks
Monday, June 15, 2009
Tuesday, April 28, 2009
Simple Gridview Webpart for Sharepoint
Open Visual Studio.....
Click on New >> Project >> and following screen will appear there select "Server controll" give any name you want to give :

then in the solution explorer 1 class file will be created give any suitable name to the class file ; here create a public class for the WebPart and then write following code to create a TextBox inside a Webpart where we will write our Queries to populate the Grid:
The pseudocode for that is as follows:
private string sqlquery;
[Personalizable(), WebBrowsable(true),WebDisplayName("SQLQuery"),Category("Data Properties")]
public string SQLQuery
{
get { return sqlquery; }
set { sqlquery = value; }
}
Here in the code above you can see the Text called as "Data Properties" that is the section for the name ; you can give what ever name you want for that section.
Now will create a childcontrol for this.
protected override void CreateChildControls()
{
base.CreateChildControls();
try
{
GridView grv = new GridView();
DataSet ds = new DataSet();
SqlDataAdapter da = new SqlDataAdapter();
string strConnection = System.Configuration.ConfigurationSettings.AppSettings.Get("connection");
string sql = sqlquery;
//DataTable dt = new DataTable();
//dt = objDB.GetSQlResult(sql);
da = new SqlDataAdapter(sql, strConnection);
ds.Clear();
da.Fill(ds, "data");
Controls.Add(grv);
grv.DataSource = ds.Tables[0].DefaultView;
grv.GridLines = GridLines.Horizontal;
grv.CellPadding = 6;
grv.DataBind();
grv.HeaderStyle.BackColor = System.Drawing.Color.LightGray;
}
catch (Exception ex)
{}
}
this code will create the Gridview webpart now you can build the solution and you can give the output path of you build to the Bin folder of the sharepoint site or you create a dll with the strogn name.
1. double click on the properties >> signing and it will allow you to give the string name for that.
2. After that deploy that dll to the Windows >> Assembly and then right-click the dll and have a look at the properties there you will find PublicKeyToken.
3. Then go to the Sharepoint's Web.Config file and register this control as Safecontrol it will look something like this:
Now open the sharepoint site and go to the Site settings >> Web parts >> New
There you will find your web part with the extension (webpart) and checked it and click on the populate gallery.
To check the webpart you create a new web part page and then click on the add web part , it will open a box there you will see your web part. add it to your page it will look something like this:
 Here you will have an option of Edit the web part click on that and you will a contex menu on side there you will be able to see the "Data Propertie" under that you will find textbox ; there you can write your Query. and accordingly Data will get populated.
P.s : here i have assumed that you will have a connection string inside the Web.Config you can write the connection string dynamically also, by assigning some more Properties for the web part as we have created "data properties." , you can create some more..!!
Subscribe to:
Comments (Atom)